Tuesday 30 July 2019

2019 Wk 30 - Catch up

We had a good turn out at the last Crafty Church: with people crocheting, cross stitching, sewing and a fair bit of chatting!  The red dress (middle top) and the gingham skirt (middle bottom) are the finished items from a month ago - can I remind you that the girls that created these are 10 and 8!!!!!

One of my Chertsey Museum ladies sent me this pic of her finished coffee cosy - now I wish I'd lined mine in the same fabric as the binding - it looks great!

In preparation for a few babies that are currently 'under construction' I have managed to finish two i-spy brick quilts: one purple and one grey

 And my senior citizen's class last week had 16 people concentrating very hard on mixing flour and water and birdseed!

 Lots of bird seed cakes got finished

and are looking good!

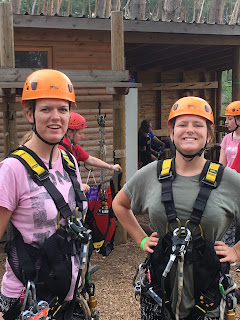
And totally NOT craft related, we went away for a weekend with friends for her 60th birthday: all 4 of us (she is their Godmother) and the three of them (we are their daughter's Godparents) and her boyfriend.  We had a really great time - these two (and the other 2 'children' and the two husbands, but I didn't get a pic of all of them) happily scaled trees and zoomed up cargo nets and down zip wires - me and Carol??  We held their bags and jackets at ground level!!!!

Monday 22 July 2019

2019 Wk 30 - some progress

Thanks to the big horizontal surfaces we have at Crafty Church I managed to get three tops spray basted - I don't even think I showed this first one as a completed flimsy!  1767 hexies!!!

It has been spray basted onto a fleece blanket, and tacked around the edges, but quilting (it will be hand quilted inside the flowers!) is a hot task, so that will wait until the cooler months

Same with this one: fewer pieces (270 maybe?), and a smaller result (definitely just a lap quilt as I ran out of Australian fabrics and didn't want too much repetition) ), but spray basted onto fleece and waiting to be quilted

and finally this one has been spray basted onto just a cotton sheet.  It will be machine quilted but will have to wait its turn  (thank you Jackie for the gorgeous FQ pack!)

The reason the sunshine block will have to wait?  There are 4 brick wall i-spy quilts that have been cut and are being pieced, so the machine is threaded with grey until these are done - I have a stall at a village fair at the end of next month so I need to have some stuff to show and hopefully sell!!!


And because there has to be *some* EPP going on . . . I've started piecing this one


Tuesday 16 July 2019

2019 Wk 28 - EPP Sewing Machine (and bird seed cakes!)

 Since I last blogged I have pieced this!

I was 'on duty' with M-i-L on Friday: hairdresser's appointment, visit to the Town Hall and a few other places on our list so I brought a new hand sewing project with me.  Clearly having the rainbow hexie flowers to finish piecing (just half a dozen flowers left) and the Plus Blocks (to *start* piecing) isn't enough EPP to have on the go at one time . . . , and Sharon gave me this FP so it would have been rude not to!  The colours, while muted, are brighter that I can photograph them.  No idea why!

Having done a couple of FPs in the last months, I wasn't feeling the love, so I decided to cut all the pieces out and EPP it instead.


On Saturday I had a break from the sewing machine as we had a family party: 20 or so of us at S-i-L's.  Three munchkins (well two plus Niki!) thoroughly enjoyed testing a paper-plate-weaving project me for

I then carried on with the EPP on Sunday.  There was a problem converting from FP to EPP: each thickness of fabric (as it wraps from front to back) adds maybe a mm to the width of the card template, so when a piece with lots of fabric pieces tries to match up with a piece with hardly any pieces the first is longer than the second.  Mostly the pieces can be eased / persuaded / bullied into fitting, but there was one place where it just couldn't - so I unpicked and trimmed 1cm off one template and it all fitted brilliantly!  I had already adapted a few pieces as they would have been two small.  I re-drew one and merged another two and abandoned another but I'm rather pleased with how it turned out

The lines here are shadows: I'm not yet sure how to quilt it.  Maybe just running stitch in muted pearle in the sewing machine and white for the background or maybe a mix of machine stitch and hand stitching?  Any suggestions?

Monday saw us spending much of the day back with this game old bird!

This is my gorgeous M-i-L who still lives alone without much help at 91.  The appointments of Friday, and the family party on Saturday took it out of her so she had a day in bed on Sunday.  However it also turned out that she hadn't eaten, had hardly drunk anything, had developed a hernia, had been sick . . . but hadn't wanted to bother anyone.  We finally got the Dr out to her who was very concerned about the hernia & sickness combination and packed her off to hospital.  They operated this morning and we are waiting to hear what they found.

My other making has involved bird seed.  Along with the plate weaving and a few other crafts, I am teaching bird seed cakes in a few weeks time.  Pinterest has loads of recipes but sadly they do not seem to work as well as the posters suggest!

Here are my samples: I used lots of different bonding agents: gelatin (to bloggers instructions 1:100), jelly (orange flavoured!), suet, gelatin (to my instructions - 1:10), flour and water, egg whites - and hope that (a) one of them sets enough to work and (b) I can remember what I did on that one as I didn't think to write anything down!!!

Finally - just looking at this puts me into a very happy place!  It's a quilt that Jackie is currently finishing and I just love the calm colours and the beautiful blocks!  Well done Jackie!

Friday 12 July 2019

2019 Wk 28 Serendipity!

I went for a job interview earlier this week: at a local university (Royal Holloway) which has recently opened a new library, named after Suffragette Emily Davison.  She was probably best known for being killed by a horse at a horse race.  She had attended Royal Holloway University.

The interview seemed to go well, but I have no idea how I did compared to the others who applied - however even if I didn't get the job it was worth the trip as I got to see a fantastic triptiage wall hanging depicting Emily:

and I got a few zoomed in pics of the quilting

I could have spent hours just looking at it!!!

And outside there was a gorgeous patch of wild flowers

I had to leave eventually though!!!  Having been to Richmond and Kew on Monday I had some selvedge edges donated by the lovely Plum, which I sat and added to previous donations

I have enough now to do something with - I just need to be inspired!!!

Thursday 11 July 2019

2019 Wk 28 - a round up

I've been working on the temperature embroidery - it's getting quite long!  I am enjoying playing with random stitches. 


We have a newly started community radio station covering our two villages and another half dozen or so.  You can google it and can listen on-line.  Not necessarily highly professional but very enthusiastic!!

One of the trustees is a good friend of mine.  She had a 60th party a few weeks ago - she didn't want any pressies, but I decided to ignore that request.  It was only a humble calico tote bag, but it came out well!!!

I did some other embroidery too - Chertsey Museum is preparing for a display called Pleats and Drapes, could I please embroider on some samples.  You can't see them but the fabrics are pleated to show the different types.

And finally a whole bunch of T-shirts for the local scouts

Including a special one for the Quartermaster!

Sunday 7 July 2019

2019 Wk 27 - Travel pouch - comments welcome!

This was inspired by a number of small handbags that I have been given or have made, but it is my own design.  I'm really pleased with it and want to make more so the instructions are here to remind me, but feel free to have a go.  (And if you do, do let me know how you get on with it!)

The pouch has a vinyl front pocket (passport or ID?) a zipped front pocket (cash ?) a big inner pockets for mobile and glasses and a back zipped pocket (for credit cards?)

I started with a piece of denim recycled from a pair of jeans (NB - dont use stretch denim next time!)  I cut it to 18 (second try I cut to 20") x 6.5"  and rounded the corners at one end (using a drinking glass).  I will later cut a piece from lining fabric, but that can wait until the denim piece is ready

I cut 1.5" off the end with original corners to make a pocket

To make the front pocket
Cut two pieces lining fabric 6.5 x 7
I used a zip that was more than 6.5" and added it to one of the pieces of cut denim and pocket (zip front to right side of denim, zip back to right side of lining)

Stitch, flip over both fabrics, finger press (because I'm lazy) and top stitch

repeat with the other piece of cut denim

To make the vinyl pocket:
Cut a piece of trimming fabric 2 x 14".  Fold in half along the length and press, then fold the long edges in to meet the pressed line and press in place.  Cut a piece of vinyl 5.5" x 7".
Slide the long edge of the vinyl into the folded opening, and stitch the trim over the vinyl.  The extra 7" will be used later, stitch along the long edge so it doesn't open

Place pins at a point 8" from the squared ends. Stitch vinyl to denim (with trim towards rounded ends)

Flip vinyl over (you could pin or clip it into place: if using pins only pin through the fabric not the vinyl)

To make the rear pocket: Cut a 4" piece of denim off the rounded ends. Insert zip as with front zip pocket

Stitch the bottom of both pockets and trim excess fabric (it was easier than trying to work out which side needed to be longer than the other!!!)

Back of denim

Front of denim

Lay the denim out flat and measure it so you can cut a piece of lining exactly the same size.

Pin, clip or tack half an inch at the squared end (wrong sides together).  I found it folded neatly around the zip (*)

Move the zipper pulls to the middle of the zip.

Hey you - at the back - yes you, the one not paying attention: MOVE THE ZIPPER PULLS TO THE MIDDLE OF THE ZIP.  Trimm off the zip ends in line with the denim.  Try *really* hard not to absentmindedly pull the zip to open or close it yet


Fold, flipping the rounded end on top of the vinyl, using the vinyl-to-denim stitching as the fold line (left below) and fold the lining the same (remember to fold down the end of the lining to match the denim (not shown).  If you flip them over they look like this

Make 2 small lengths of strap from small D rings and the excess vinyl binding earlier, or use ribbon.  If you don't have D rings you could just use the strap.
 

Place these at the sides, in line with the zip above the vinyl pocket: strap raw edges match the raw edges on the denim piece, and D rings and straps laying against the zip (as shown)


Now flip the lining piece onto the denim piece so the shorter sections are wrong sides together.  Check in the middle of the sandwich - the folded (maybe pinned, clipped or tacked) straight edged ends (shown in red) need to be touching and matching (*)


And breathe!!!

Now - stitch around the 3 raw edges!  No turning gap needs to be left as you created one at (*)

I was too lazy to make rounded  corners on my lining so I stitched from the denim side and trimmed the corners after.  Carefully cup into the convex curves - these will finish as concave so they need little triangles cut from the raw edge to *almost* the seam

Now find the opening with the folded (tacked, clipped or pinned?) ends, and pull the whole lot through there.  It may well need some re-adjusting but you should end up with this

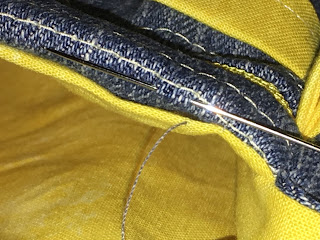
Slip stitch the opening closed

I made a strap using rope folded at the end around a small lobster clasp and used embroidery thread to hold it all closed (this method) and tada!!!!

However (drat and fiddlesticks) the flap doesn't fold over enough, so the next version will have slightly longer measurements.  I'll have a go at using KAM press studs / poppers when I get a chance

And then I made another one with different pockets!