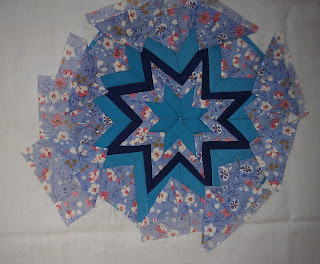
Last Friday I taught a class how to do a Somerset Star at the request of one of the Chertsey Museum ladies: all very well but I had to find out how to make it! I Googled it, and a few 'recipes' came up, but they seems to all use different methods, so I took the simplest bits from each one, and thought I'd share it with you here.
It seems to be called Somerset Block, and Folder Star, but as fan of alliteration, I have gone for Somerset Star!
I'm pleased to report it's not as hard as it looks:
I started with background fabric about 10x10 (or cushion size plus a few emergency inches) pressed in half in all 4 directions making an 8 line star in the centre (like making a fortune teller thingy at primary school, or I think Americans call it a coutie catcher)
I then carefully cut four 5x5 squares, and pressed them first in half, then into triangles by folding the fold into the middle (did you ever make a hat or a boat from a sheet of newspaper?).
I arranged these in the middle using the horizontal and vertical folds (+) in the background fabric to help align them, and I stitched them down along the outer edge.
Then I cut eight squares in a new fabric, again 5x5 inches, again the folding and pressing. Next I carefully measured 1/2 inch from the centre, and place 4 triangles on the + lines, and the other 4 using the diagonal (x) lines, and stitched down near to the raw edge.
Round 3 was the same as round 2, but using a different fabric (either in a third fabric, or back to number 1) but now placed 1 inch from the centre (keep using the fold lines in the background to keep straight)
Round 4: same again
For the 5th round, some internet examples arrange 16 folded triangles - the normal 8 and then the others in between them - try placing them and see if you like them.
Now you have pretty much finished this bit. If you want to make a cushion cover, use the stitch and flip method to cover the seams and bulk out to the size you need. If you want to make a pot mat, add a layer of wadding, and a layer of insulbrite (?), then backing fabric, and bind.
I haven't included stitching down the points. I really like the 'monsters mouth' effect of leaving them free, but don't think it would go well in the washing machine, so the recommended method is to stitch each point down at each stage. Just telling you!
Confession: The two blue Stars aren't even mine - two students did these - good eh? and they had enough squares cut to complete each round. LOL
I started this blog for me - it expanded to show BFF Jackie what I was doing - and a few others have invited themselves too - everybody welcome! Mostly about patchwork, with random comments about embroidery, family and life in general, come on in, put your feet up, and I'll put the [virtual] kettle on.


That made my brain hurt - but they look good!
ReplyDeleteCunning plan! I see you're still out of red though ;o)
ReplyDeleteGlad your class went well.
ReplyDeleteLovely block Benta (I got lost around half way through and just took another glug of wine)! xx
ReplyDeleteThis looks great. I agree it's nicer not to sew down the points I think the mouths are what give them their character.
ReplyDelete